Web Frontend – Windows
Running the bot on Linux? Use the Linux guide instead. In a hurry? The Quick Start gets a working login page in about five minutes with the
/webadmin setupwizard, and puts HTTPS on top of it. This page is the full reference: every option, and every step explained.
DCSServerBot comes with a web frontend that lets you manage your nodes and servers from a browser. It is part of the WebService and is turned off by default.
What people can do once logged in depends on their role:
| Role | What they can do |
|---|---|
| Admin | Edit node and server configurations |
| DCS Admin | Edit server configurations only |
managed_by roles (see servers.yaml) |
See and manage only the servers assigned to them (useful for hosters) |
The setup has three parts:
- Steps 0–2: turn the frontend on and log in on your own PC or network.
- Step 3 (optional): put it on the internet safely, behind HTTPS, using nginx. If you prefer Caddy, see Step 4.
- Troubleshooting: a table of common problems and fixes at the end.
Step 0 – Pick your login method
Tip
Do you just want it running? /webadmin setup in Discord does Steps 0 and 1 for you: it asks
for the address, the port and the login, generates the session secret, writes
config/services/webservice.yaml and offers to rebuild the console. The wizard is described in the
Quick Start.
Everything below is the same setup done by hand, with the reasons.
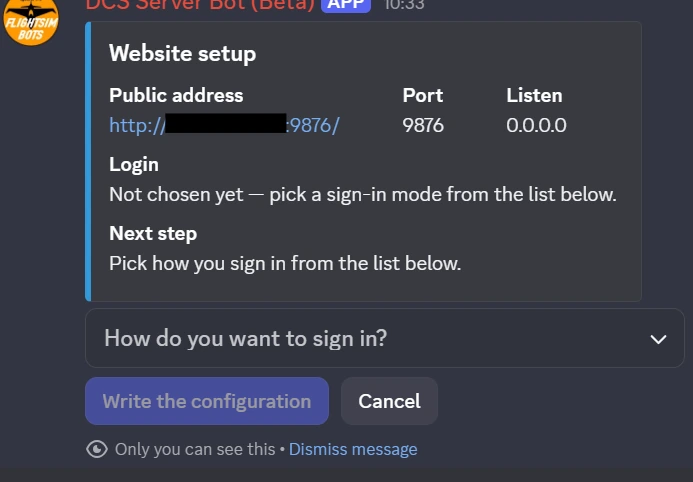
There are two ways for people to log in. Pick one:
| Option A: Discord login | Option B: Local users | |
|---|---|---|
| How people log in | With their Discord account | With a username/password you create |
| Needs | A domain name with HTTPS (e.g. https://bot.example.com), see Step 3 |
Nothing extra; plain HTTP works on your LAN |
| Roles come from | Your Discord roles (via the roles: mapping in services/bot.yaml) |
The roles you write next to each user |
| Recommended for | Communities with several admins | Single admin, testing, LAN-only setups |
Note
Discord only allows its login to send people back to an https:// address, which is why Option A needs HTTPS.
If you want Option A, do Step 3 first (or at least alongside), because Discord login won't work until HTTPS does.
All bot commands below are run in a Command Prompt opened in your DCSServerBot folder, for example:
cd "C:\DCS Server\DCSServerBot"
They use the bot's own Python, which lives in %USERPROFILE%\.dcssb-%COMPUTERNAME%.
If you installed the bot with a custom node name (install.cmd -n MyNode), replace %COMPUTERNAME% with that name.
Step 1 – Generate a session secret (both options)
The session secret is a random password the website uses to sign login cookies. You only need it once, and nobody types it in.
"%USERPROFILE%\.dcssb-%COMPUTERNAME%\Scripts\python" -c "import secrets; print(secrets.token_urlsafe(48))"
Copy the long line it prints. You'll paste it into webservice.yaml below.
Caution
Treat the session secret like a password. Anyone who has it can forge logins.
Option A – Discord login (HTTPS)
A1. Set up OAuth2 in the Discord Developer Portal
- Open the Discord Developer Portal and select your bot's application.
- Go to OAuth2.
- Copy the Client ID.
- Copy the Client Secret. You may have to press Reset Secret to see it.
- Under Redirects, press Add Another (older versions of the portal call it Add Redirect) and enter:
Replace
https://your-dns-name/auth/discord/callbackyour-dns-namewith your real domain. It must matchpublic_base_urlin the next step exactly: samehttps://, same spelling, no trailing slash. - Press Save Changes.
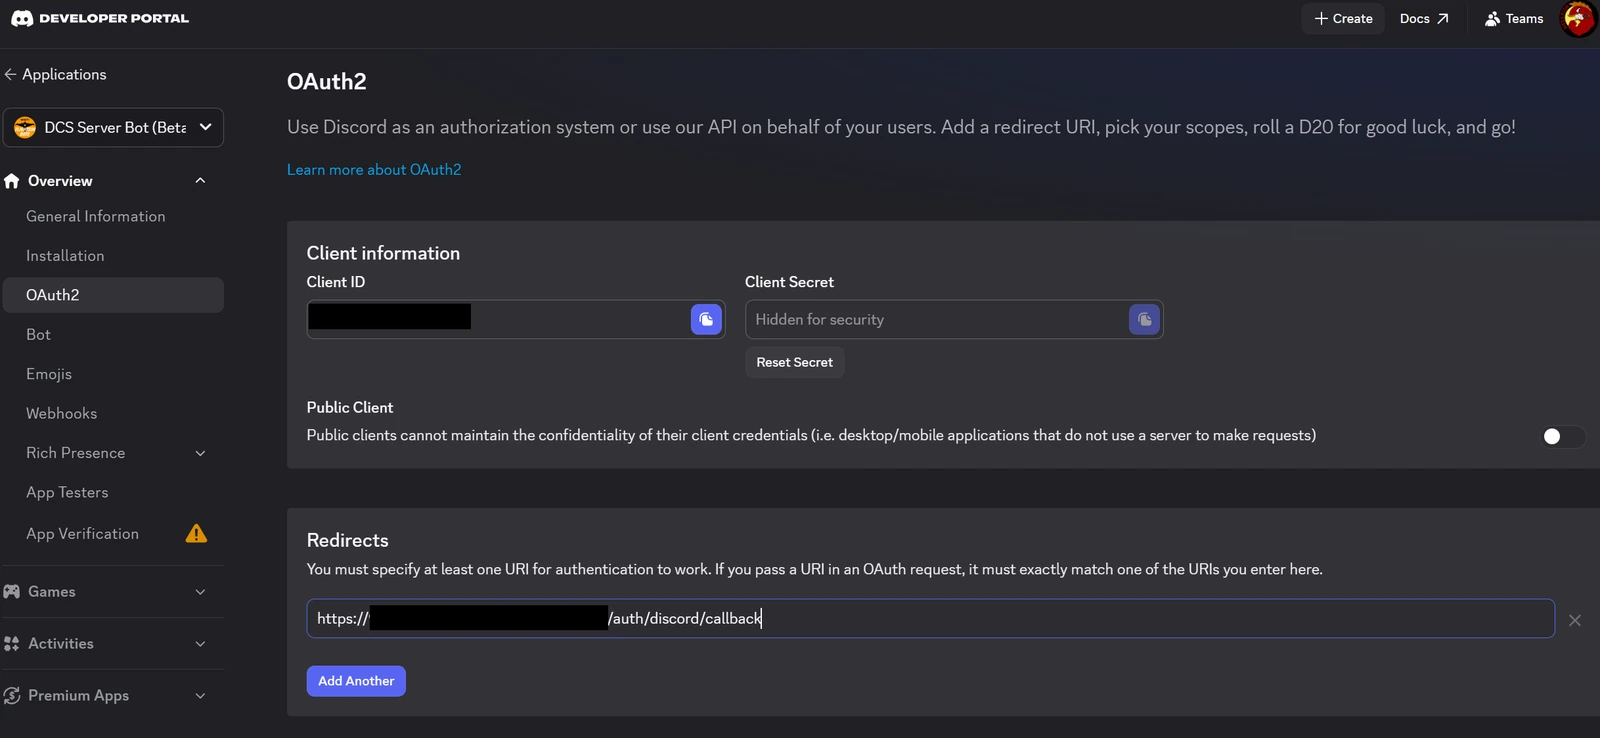
Client ID and Client Secret at the top, the redirect list below them. The values in this screenshot are blanked out — yours are specific to your application.
A2. Edit config/services/webservice.yaml
Create the file if it doesn't exist. Replace everything in <...> with your values, and keep the quotes.
# config/services/webservice.yaml
DEFAULT:
  listen: 127.0.0.1         # only the reverse proxy on this PC can reach the bot (see Step 3)
  port: 9876
  debug: false
  frontend: true            # THIS ENABLES THE FRONTEND
  session:
    secret: '<your session secret from Step 1>'
    https_only: true        # correct for HTTPS
  auth:
    public_base_url: https://your-dns-name   # no trailing slash; must match the Discord redirect
    discord:
      enabled: true
      client_id: '<your client id>'
      client_secret: '<your client secret>'
Then continue with Step 2 and Step 3.
Option B – Local users (HTTP)
B1. Create a user
Run this for each person who should have access, changing the username and role:
"%USERPROFILE%\.dcssb-%COMPUTERNAME%\Scripts\python" -m services.webservice.auth.local --hash --username "MyFancyUser" --roles Admin
- It asks for the password twice. Nothing is shown while you type; that's normal.
- It then prints a small YAML block containing a
password_hash. You'll copy the hash into the file below. - Valid roles are
AdminandDCS Admin. ForDCS Admin, keep the quotes:--roles "DCS Admin".
B2. Edit config/services/webservice.yaml
Create the file if it doesn't exist. Replace everything in <...> with your values.
# config/services/webservice.yaml
DEFAULT:
  listen: 0.0.0.0           # 0.0.0.0 = reachable from other PCs on your network; use 127.0.0.1 for this PC only
  port: 9876
  debug: false
  frontend: true            # THIS ENABLES THE FRONTEND
  session:
    secret: '<your session secret from Step 1>'
    https_only: false       # MUST be false when using plain HTTP, or logins won't stick
  auth:
    public_base_url: http://<your-ip>:9876    # the address people type in their browser
    local:
      enabled: true
      users:
        - username: MyFancyUser
          password_hash: '<hash from B1>'
          roles: [Admin]
        - username: AnotherUser
          password_hash: '<hash from B1>'
          roles: [DCS Admin]
Add one - username: block per person. The - username, password_hash and roles lines must stay lined up exactly as shown, because YAML is picky about spaces.
Warning
With plain HTTP, passwords travel unencrypted. Only use this on a network you trust (LAN or VPN). To use local users over the internet, do Step 3 and switch to the HTTPS settings shown there.
Step 2 – Restart and open the website
- Restart DCSServerBot.
- Open the website on the bot PC: http://localhost:9876/
- Log in with your username/password (Option B). Option A users can't log in yet; continue with Step 3.
Option B only: to reach it from another PC on your network at http://<bot-pc-ip>:9876/, allow the port through Windows Firewall:
netsh advfirewall firewall add rule name="DCSServerBot Web" dir=in action=allow protocol=TCP localport=9876
Caution
Never forward port 9876 on your router. If you want access from outside your home or network, use Step 3.
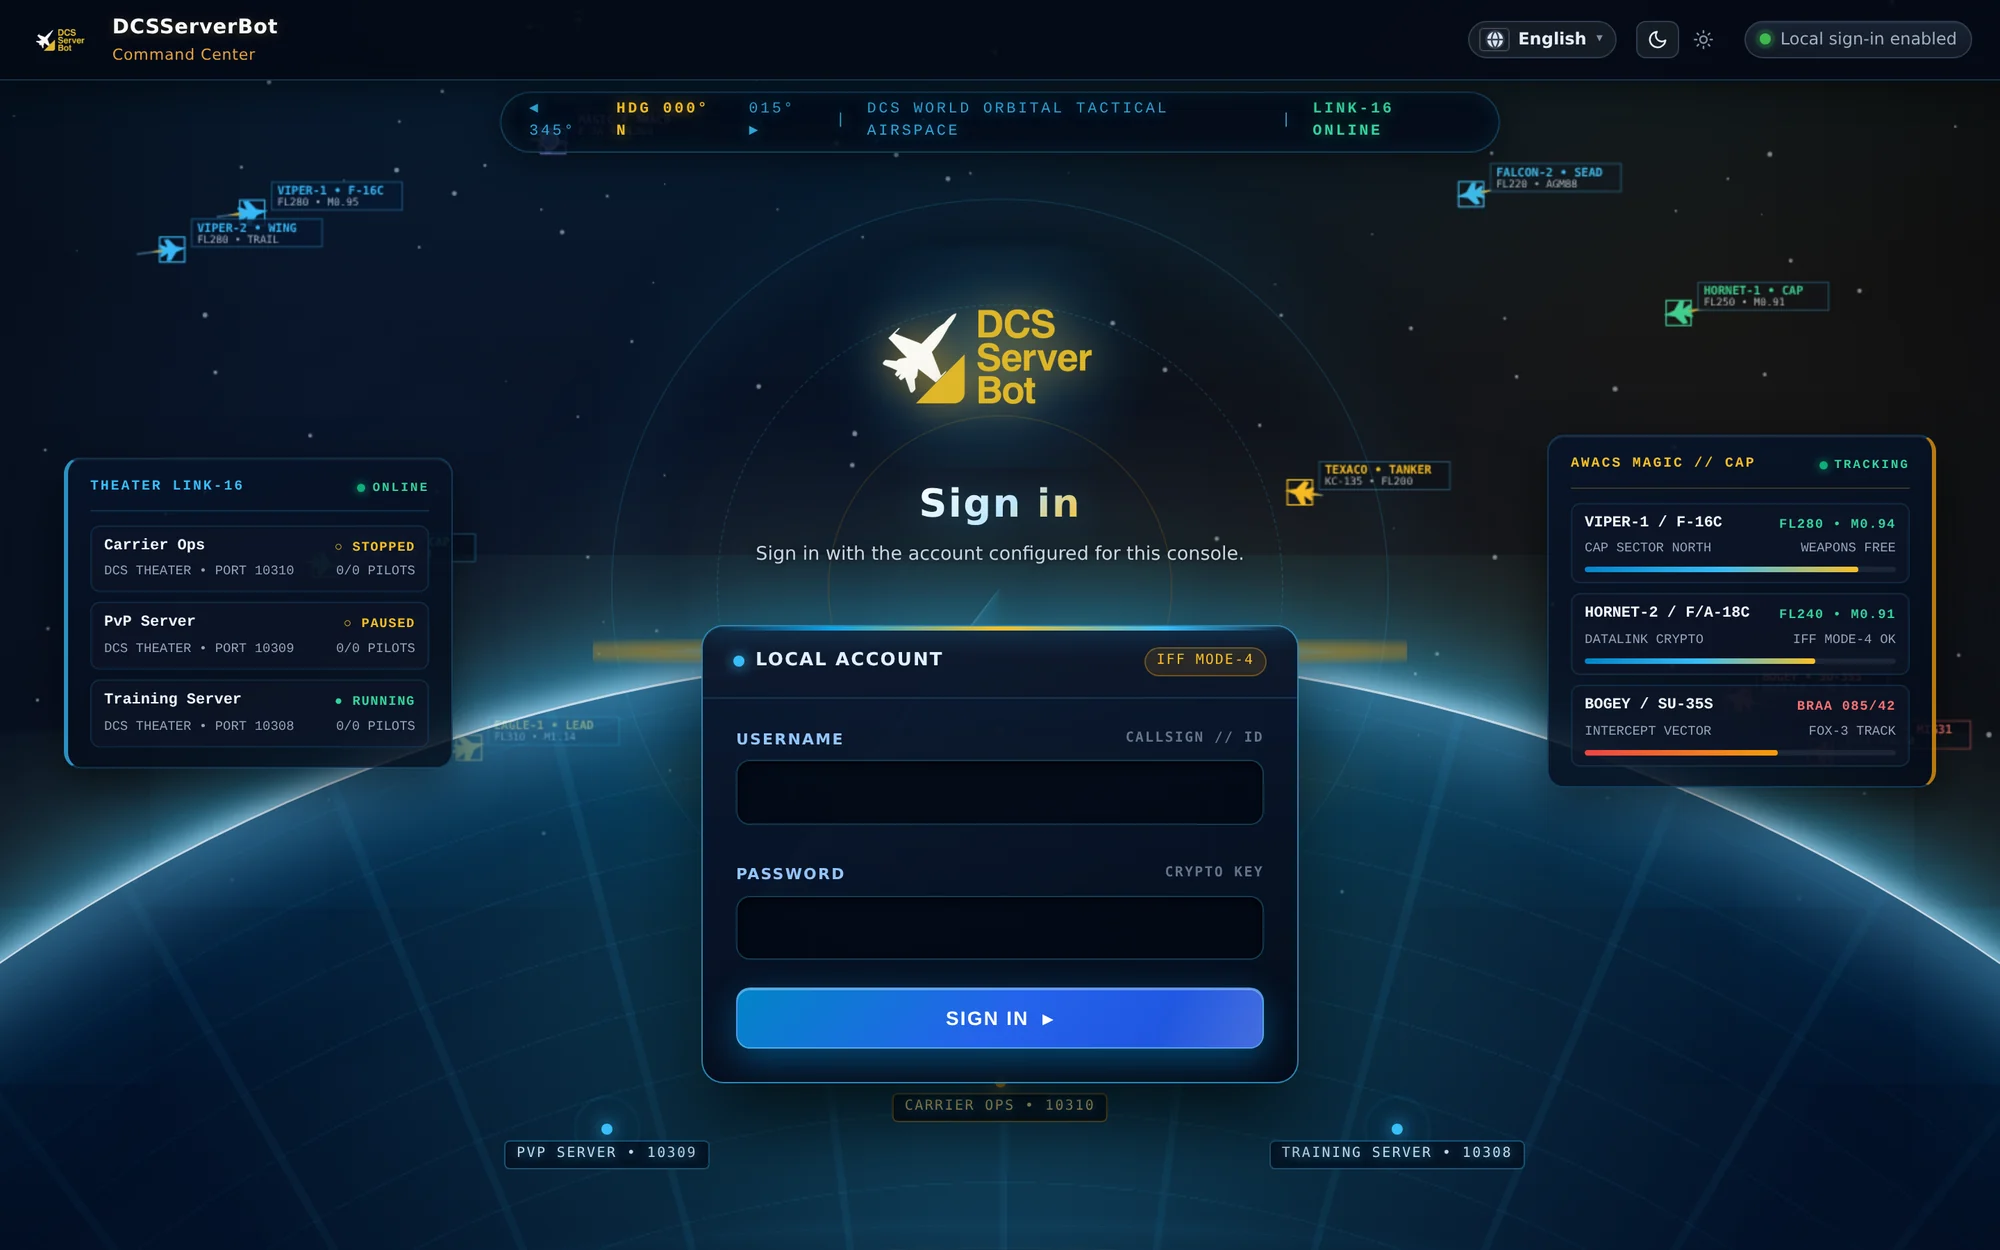
2.1 What you should see
The sign-in page, on the address you configured:
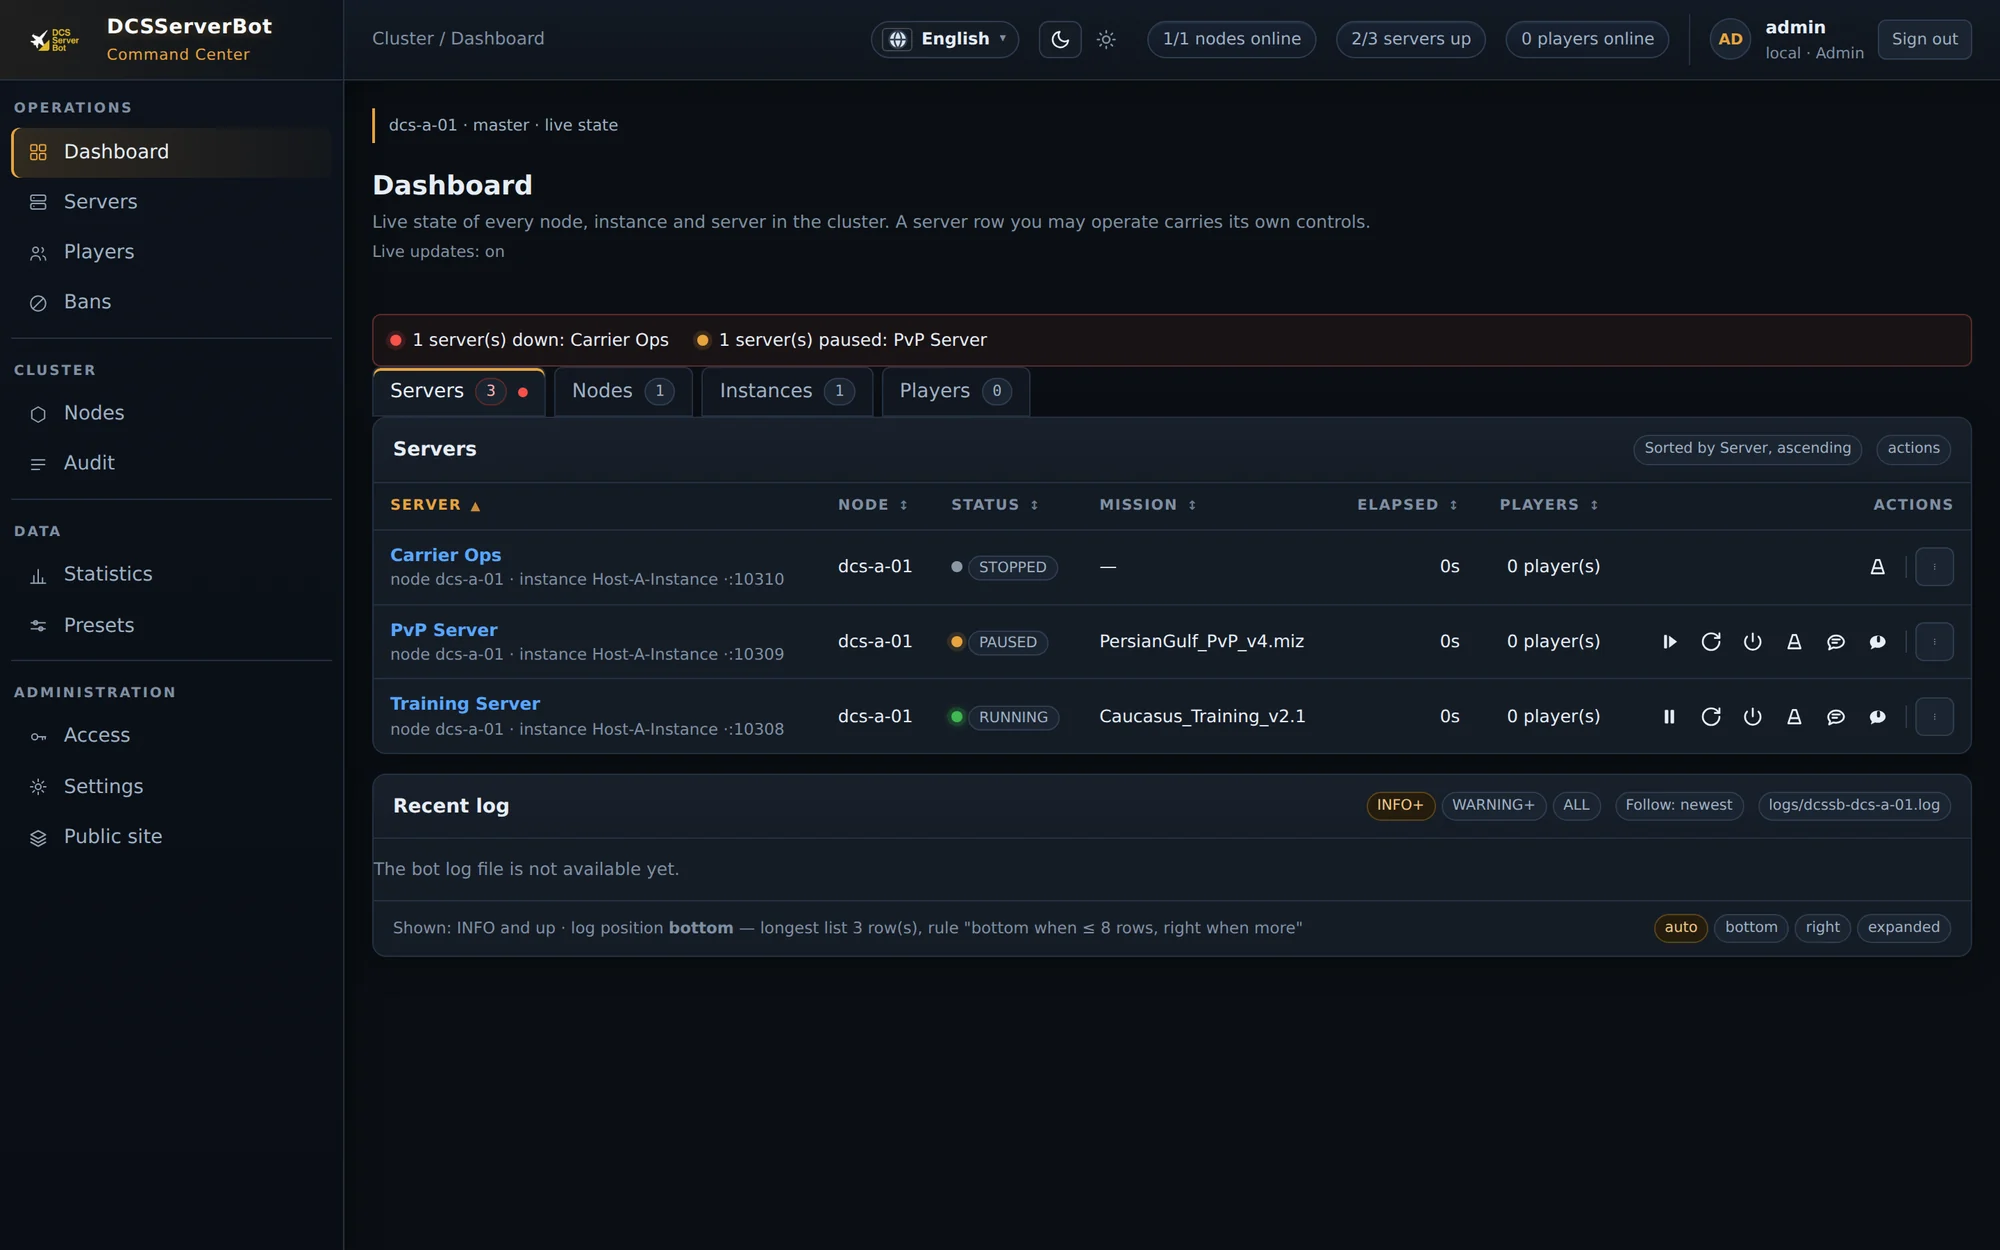
After logging in, the dashboard — every server of every node, its state, mission and players:
A page that renders but refuses the login, or a browser that cannot connect at all, is covered in Troubleshooting at the end of this page.
Step 3 – Serve it on the internet with HTTPS (nginx reverse proxy)
A reverse proxy is a small web server that sits in front of the bot. Browsers connect to it over HTTPS on the normal web ports (80/443), and it passes the traffic on to the bot on 127.0.0.1:9876, a port that is never exposed to the outside world.
Browser ──HTTPS (443)──▶ nginx (on the bot PC) ──HTTP──▶ DCSServerBot (127.0.0.1:9876)
                                                         not reachable from outside
This step uses nginx for the proxy and win-acme for a free, auto-renewing Let's Encrypt certificate.
Tip
Prefer Caddy? Caddy handles certificates by itself and needs less setup. Do 3.1, 3.3 and 3.7 below, then follow Step 4 instead of 3.2, 3.4, 3.5 and 3.6.
3.1 What you need
| Requirement | Why | How |
|---|---|---|
A domain or subdomain, e.g. bot.example.com |
Certificates are issued for names, not IPs | Any registrar. A subdomain of a domain you already own is fine |
| A DNS A record pointing that name to your public IP | So browsers find your PC | In your DNS provider's panel. Find your public IP by searching "what is my IP" |
| Dynamic DNS, if your home IP changes | Keeps the A record correct | Use your DNS provider's dynamic DNS feature or a DDNS updater tool |
| Ports 80 and 443 forwarded on your router to the bot PC | 80 is used to get and renew the certificate, 443 to serve the site | Router admin page → Port forwarding → TCP 80 and 443 → the bot PC's LAN IP |
| Windows Firewall allowing 80 and 443 | Same reason | See 3.3 |
Note
Using Cloudflare for DNS? Set the record to DNS only (grey cloud) for the first setup, so the certificate request reaches your PC directly. You can switch to Proxied (orange cloud) afterwards, but then set Cloudflare's SSL/TLS mode to Full (strict).
Note
Can't forward ports (some ISPs, mobile/Starlink connections, CGNAT)? Then a direct reverse proxy won't be reachable from outside. Your options are a VPN between you and the bot PC, or a tunnel service. Both are outside the scope of this guide.
3.2 Install nginx
- Download the Stable version for Windows (
nginx/Windows-1.x.x) from https://nginx.org/en/download.html. - Unzip it. Inside is a folder like
nginx-1.x.x. Move its contents toC:\nginx, so thatC:\nginx\nginx.exeexists. - Create a small helper script that reloads nginx. You'll use it now and the certificate tool will use it after every renewal.
Save it as
C:\nginx\reload.cmd:
@echo off
cd /d C:\nginx
nginx.exe -s reload
3.3 Open the firewall for 80 and 443
Run in a Command Prompt as Administrator:
netsh advfirewall firewall add rule name="nginx HTTP" dir=in action=allow protocol=TCP localport=80
netsh advfirewall firewall add rule name="nginx HTTPS" dir=in action=allow protocol=TCP localport=443
If you added the DCSServerBot Web rule for port 9876 in Step 2 and no longer need LAN access on that port, remove it:
netsh advfirewall firewall delete rule name="DCSServerBot Web"
3.4 Phase 1 nginx config (HTTP only, to get the certificate)
nginx refuses to start if a config points to certificate files that don't exist yet. So the setup happens in two phases: first HTTP only, to get the certificate, then HTTPS.
Replace the whole content of C:\nginx\conf\nginx.conf with this, using your own domain:
# C:\nginx\conf\nginx.conf  (PHASE 1: HTTP only)
worker_processes  1;

events {
    worker_connections  1024;
}

http {
    include       mime.types;
    default_type  application/octet-stream;
    sendfile      on;
    keepalive_timeout  65;

    server {
        listen 80;
        server_name bot.example.com;

        # Let's Encrypt validation files (written by win-acme)
        location /.well-known/acme-challenge/ {
            root C:/nginx/html;
        }

        # Everything else goes to HTTPS
        location / {
            return 301 https://$host$request_uri;
        }
    }
}
Important
Use forward slashes (C:/nginx/html) for paths inside nginx.conf, even on Windows.
Test and start nginx. Run as Administrator:
cd /d C:\nginx
nginx.exe -t
start nginx.exe
nginx.exe -t must say syntax is ok and test is successful. If it doesn't, fix the error it names before starting.
3.5 Get the certificate with win-acme
- Download win-acme (the x64 trimmed zip) from https://www.win-acme.com/ and unzip it to
C:\win-acme. - Run
C:\win-acme\wacs.exeas Administrator. It shows a menu; the exact wording can differ slightly between versions. - Choose these answers:
| win-acme asks | Answer |
|---|---|
| Main menu | M: Create certificate (full options) |
| How to determine the domain(s) | Manual input → type bot.example.com |
| Split into multiple certificates? | Keep as a single certificate |
| How to prove you own the domain | [http] Save verification files on (network) path → C:\nginx\html |
| Copy default web.config? | No (that's for IIS) |
| Key type | RSA (the default is fine) |
| How to store the certificate | PEM encoded files (Apache, nginx, etc.) → C:\nginx\certs |
| Password for the private key | None |
| Add another store? | No |
| Installation step | Start external script or program → script: C:\nginx\reload.cmd, no parameters |
| Add another installation step? | No |
| Terms of service / email | Accept, and enter your email (for expiry warnings) |
When it's done, C:\nginx\certs contains files including:
bot.example.com-chain.pem   ← certificate + chain
bot.example.com-key.pem     ← private key
win-acme also creates a scheduled task that renews the certificate automatically and runs reload.cmd afterwards. You don't need to do anything else for renewals; just keep port 80 open.
3.6 Phase 2 nginx config (HTTPS)
Replace the whole content of C:\nginx\conf\nginx.conf again, this time with the full config, using your own domain:
# C:\nginx\conf\nginx.conf  (PHASE 2: HTTPS)
worker_processes  1;

events {
    worker_connections  1024;
}

http {
    include       mime.types;
    default_type  application/octet-stream;
    sendfile      on;
    keepalive_timeout  65;

    # Needed for WebSocket connections, if the frontend uses them
    map $http_upgrade $connection_upgrade {
        default upgrade;
        ''      close;
    }

    # Port 80: certificate renewals + redirect to HTTPS
    server {
        listen 80;
        server_name bot.example.com;

        location /.well-known/acme-challenge/ {
            root C:/nginx/html;
        }

        location / {
            return 301 https://$host$request_uri;
        }
    }

    # Port 443: the actual website, passed through to DCSServerBot
    server {
        listen 443 ssl;
        server_name bot.example.com;

        ssl_certificate      C:/nginx/certs/bot.example.com-chain.pem;
        ssl_certificate_key  C:/nginx/certs/bot.example.com-key.pem;
        ssl_protocols        TLSv1.2 TLSv1.3;

        location / {
            proxy_pass          http://127.0.0.1:9876;
            proxy_http_version  1.1;
            proxy_set_header    Host               $host;
            proxy_set_header    X-Real-IP          $remote_addr;
            proxy_set_header    X-Forwarded-For    $proxy_add_x_forwarded_for;
            proxy_set_header    X-Forwarded-Proto  $scheme;
            proxy_set_header    Upgrade            $http_upgrade;
            proxy_set_header    Connection         $connection_upgrade;
        }
    }
}
Test and reload. Run as Administrator:
cd /d C:\nginx
nginx.exe -t
nginx.exe -s reload
3.7 Point the bot at the proxy
In config/services/webservice.yaml, the bot must listen only locally and know its public HTTPS address.
Option A (Discord login): use the A2 file exactly as shown; it is already set up for this.
Option B (local users) over the internet: change your B2 file to this:
# config/services/webservice.yaml
DEFAULT:
  listen: 127.0.0.1         # only the reverse proxy on this PC can reach the bot
  port: 9876
  debug: false
  frontend: true            # THIS ENABLES THE FRONTEND
  session:
    secret: '<your session secret from Step 1>'
    https_only: true        # true now, because browsers connect over HTTPS
  auth:
    public_base_url: https://bot.example.com  # your domain, no trailing slash, no port
    local:
      enabled: true
      users:
        - username: MyFancyUser
          password_hash: '<hash from B1>'
          roles: [Admin]
        - username: AnotherUser
          password_hash: '<hash from B1>'
          roles: [DCS Admin]
Restart DCSServerBot after saving. Then open https://bot.example.com from your phone on mobile data (not your Wi-Fi). That proves it works from the outside.
3.8 Start nginx automatically with Windows
nginx for Windows doesn't install itself as a service. The simplest fix is a scheduled task that starts it at boot. Run as Administrator:
schtasks /create /tn "nginx" /tr "C:\nginx\nginx.exe -p C:/nginx/" /sc onstart /ru SYSTEM /rl HIGHEST
Useful nginx commands for later (always from C:\nginx, as Administrator):
| Task | Command |
|---|---|
| Check the config for errors | nginx.exe -t |
| Apply config changes | nginx.exe -s reload |
| Stop nginx | nginx.exe -s quit |
| Force-stop nginx (if the above fails) | taskkill /f /im nginx.exe |
| Read the error log | type C:\nginx\logs\error.log |
Step 4 – Alternative: Caddy instead of nginx
Caddy gets and renews HTTPS certificates by itself, so it replaces both nginx and win-acme. Do 3.1, 3.3 and 3.7 from Step 3 (the firewall rules work the same; only the rule names differ), then:
- Download Caddy for Windows (amd64) from https://caddyserver.com/download, put it in
C:\caddyand rename it tocaddy.exe. - Create
C:\caddy\Caddyfile(no extension) with your domain:
# C:\caddy\Caddyfile
bot.example.com {
    reverse_proxy 127.0.0.1:9876
}
- Test it. Run as Administrator:
cd /d C:\caddy
caddy run
Within a minute it should report that it obtained a certificate. Check https://bot.example.com from mobile data, then stop it with Ctrl+C.
- Install it as a Windows service so it starts with Windows. Run as Administrator:
sc.exe create caddy start= auto binPath= "C:\caddy\caddy.exe run --config C:\caddy\Caddyfile"
sc.exe start caddy
The space after start= and binPath= is required; that's how sc.exe works. After editing the Caddyfile later, run sc.exe stop caddy and then sc.exe start caddy.
Tip
Windows Notepad likes to save files as Caddyfile.txt. In "Save as type", choose "All Files", or check with dir C:\caddy afterwards.
Security notes
- Only ports 80 and 443 should ever be forwarded on your router, and only to the reverse proxy. Never forward 9876 or any other DCSServerBot port.
- Keep
webservice.yamlandC:\nginx\certsprivate. They contain your session secret, client secret, password hashes and certificate private key. - Use strong passwords for local users; anyone on the internet can reach the login page.
- Use
debug: falseunless you're actively troubleshooting.
Troubleshooting
| Symptom | Likely cause | Fix |
|---|---|---|
'python' is not recognized… |
Using a Python that isn't on PATH | Use the full "%USERPROFILE%\.dcssb-%COMPUTERNAME%\Scripts\python" path shown above |
The system cannot find the path specified when running the commands |
Node name differs from your computer name | Replace %COMPUTERNAME% with your node name, or look in %USERPROFILE% for the .dcssb-… folder |
No module named services |
Command not run from the DCSServerBot folder | cd into the DCSServerBot folder first |
| Page loads on the bot PC but not from other PCs (LAN) | Firewall, or listen: 127.0.0.1 |
Add the 9876 firewall rule; use listen: 0.0.0.0 (LAN setups only) |
| Login seems to work, then you're sent straight back to the login page | https_only doesn't match how you connect |
false for plain HTTP, true behind HTTPS |
| Discord shows Invalid OAuth2 redirect_uri | Redirect in the Developer Portal ≠ public_base_url + /auth/discord/callback |
Make them match character for character (https, domain, no port, no trailing slash) |
| Logged in but can't edit anything | Your account has no Admin / DCS Admin role | Option A: check the roles: mapping in services/bot.yaml. Option B: check roles: for your user |
| Bot fails to start after editing the file | YAML indentation or unquoted special characters | Compare your file line by line with the example; keep secrets in quotes |
nginx: [emerg] cannot load certificate |
Phase 2 config used before the certificate exists, or wrong file names/paths | Go back to the Phase 1 config, finish 3.5, check the file names in C:\nginx\certs |
bind() to 0.0.0.0:80 failed (10013) or (10048) |
Another program is using port 80 or 443 (IIS, another web server…) | Find it with netstat -ano \| findstr :80 and stop it; then start nginx again |
| win-acme says validation failed | Port 80 not forwarded, DNS not pointing to your public IP yet, Cloudflare proxy (orange cloud) on, or nginx not running | Check router port forwarding; check the record with nslookup bot.example.com; set Cloudflare to "DNS only"; make sure nginx runs with the Phase 1 config |
| Site works on your Wi-Fi but not from outside (or the reverse) | Your router doesn't support "NAT loopback", or port forwarding is missing | Always test from mobile data. If outside works, the setup is fine |
| 502 Bad Gateway | nginx can't reach the bot | Make sure the bot is running and that the port: in webservice.yaml matches proxy_pass (9876) |
| Browser shows a certificate warning | The certificate doesn't match the name, or Cloudflare SSL mode is wrong | Use exactly the domain from your nginx config; with Cloudflare proxy on, use Full (strict) |
| Changes to nginx.conf have no effect | nginx wasn't reloaded, or several nginx copies are running | nginx.exe -s reload; if in doubt, taskkill /f /im nginx.exe and start it again |